 SmartDay Android – Guide
SmartDay is a great companion for your Android. You can view, and use, all of your SmartDay data directly on your Android phones and tablets.
Getting Started
- Sign in (or sign up) to your free SmartDay Online account.
If you do not already have a SmartDay Online account, you can sign up from the link here, or you can sign up directly from SmartDay Android when you first open the app. SmartDay Online is where all of your calendar meetings, tasks, projects, and notes are stored. - Sync with SmartDay Online from any view – either tap the ‘sync’ button at the top of the Calendar view, or ‘pull down’ on the Focus or Task views, to refresh.
- Explore the different Views: Focus, Calendar, and Tasks. You can navigate to these by tapping the SmartDay icon on the top-left of any view.
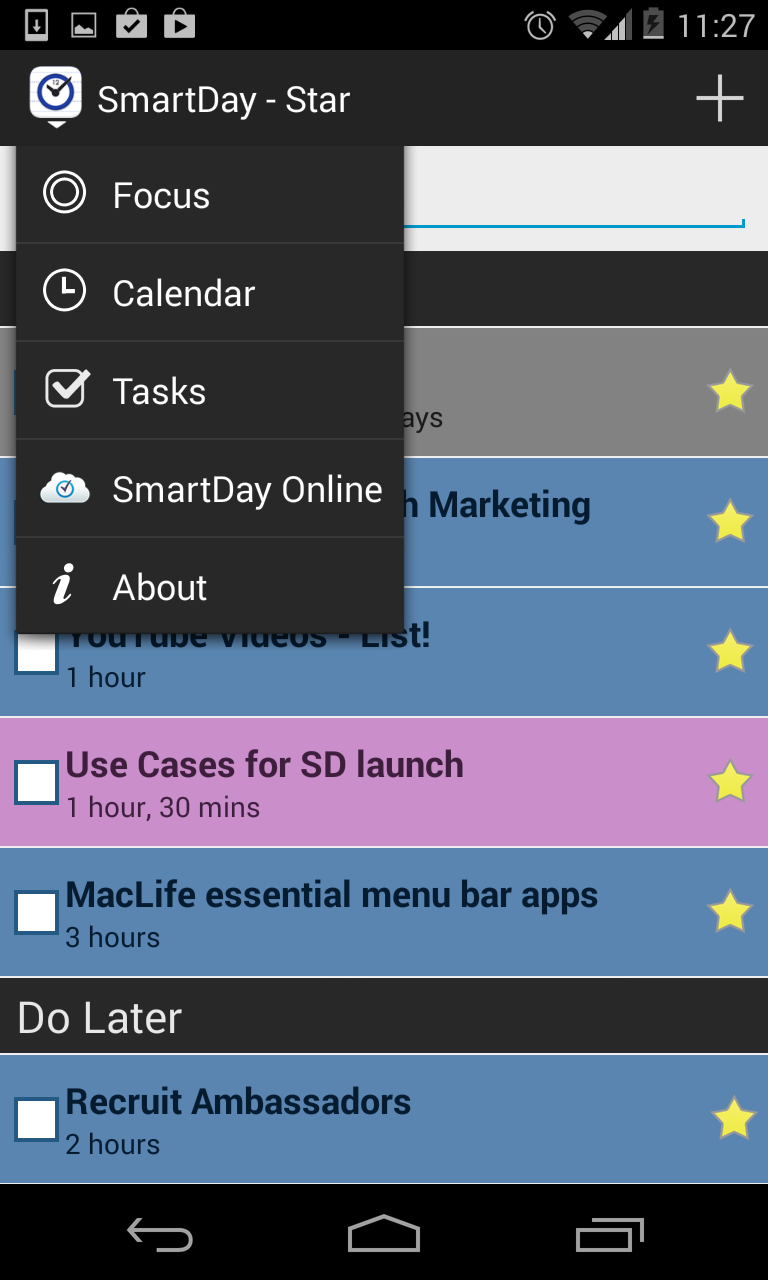
Main “Views” menu
Focus View
Focus View shows everything you need to know about today: all of your Tasks and Events, including a summary of what is remaining (after you have checked them off or after time has passed). This is a great integrated view to show you at a glance what’s up for today.

Focus View: Everything you need for today, nothing you don’t.
Calendar View
The Calendar is very special because it has the ability to show not only your meetings & appointments, but also your Tasks. To enable Task integration, go to SmartDay Online, choose Settings -> Tasks, then enable “show tasks in Day calendar”. The reason we have this in SmartDay Online is to simplify the process of setting things up in SmartDay for Android: all settings are inherited from your SmartDay Online account.

Normal Calendar on left, Integrated Calendar on right
In the above picture, you can see how the ‘normal’ calendar looks on the left side. If you enable “show tasks in Day calendar,” you will see them appear as they do on the right – in exactly the same order, and with exactly the same Filters, that are used in the Tasks View. Tasks that do not fit completely, are split around meetings, as shown with the dotted lines. In this way, you can easily see exactly which tasks will fit into your day.
Other things you can do in the Day Calendar
- Adjust Your Working Hours
Tap and hold the edge of the “day shade”, until you see a yellow outline. Drag it up or down to adjust your working hours. If you have “show tasks in Day calendar” enabled, you will see more tasks automatically flow into the extra working time that you create, or tasks automatically disappear from the bottom if you slide up to reduce your working hours. - Change the Duration of an Event
Tap and hold an Event until you see a yellow outline. Then drag the edge, to re-size it. - Change the Time of an Event
Tap and drag an Event up or down in the Day calendar. To change it to another day, edit its detail (see next). - Check out the Details of an Event
To view and edit details such as duration, alarms, any attached notes, and the project that it belongs to, simply double tap. - Navigate to Other Days
You can easily flip to other days by sliding the calendar to the left or right with your thumb or finger. You can also quickly jump to other days by tapping on the date at the top, to see the drop-down month calendar.

Jump to any day using the handy drop-down Month calendar.
Tasks View
In Tasks View, you can organize and filter the Tasks from all of your different Projects. SmartDay then uses adaptive logic to place the ones at the top of the list into the free time that you have today. These tasks are shown in the Focus view and, if you have “show tasks in Calendar” enabled, in the Calendar View.
- You can easily create new tasks on the fly, just tap the empty space at the top of the list.Tip: Be sure to guesstimate how long a new Task will take. This helps our ‘Smart’ logic figure out what you can get done each day!
- Tasks that can fit into today, will be shown under the “Do Today” heading. What fits depends on how many working hours you have in your day (set in your SmartDay Online account), on the duration of your tasks, and on the other meetings and events that you already have scheduled for the day.
- To mark a Task as “Done”, simply select the box on the left. You can undo this by going to the “Done” filter (see below) then un-check the Task.
- To change the order / priority of a Task, just tap then drag it up or down the list. Note the ‘Due’ filter automatically over-writes your order by sorting tasks by when they are Due.
Tap the title bar to view the drop-down menu that gives you several ‘smart’ filters for easy prioritizing:
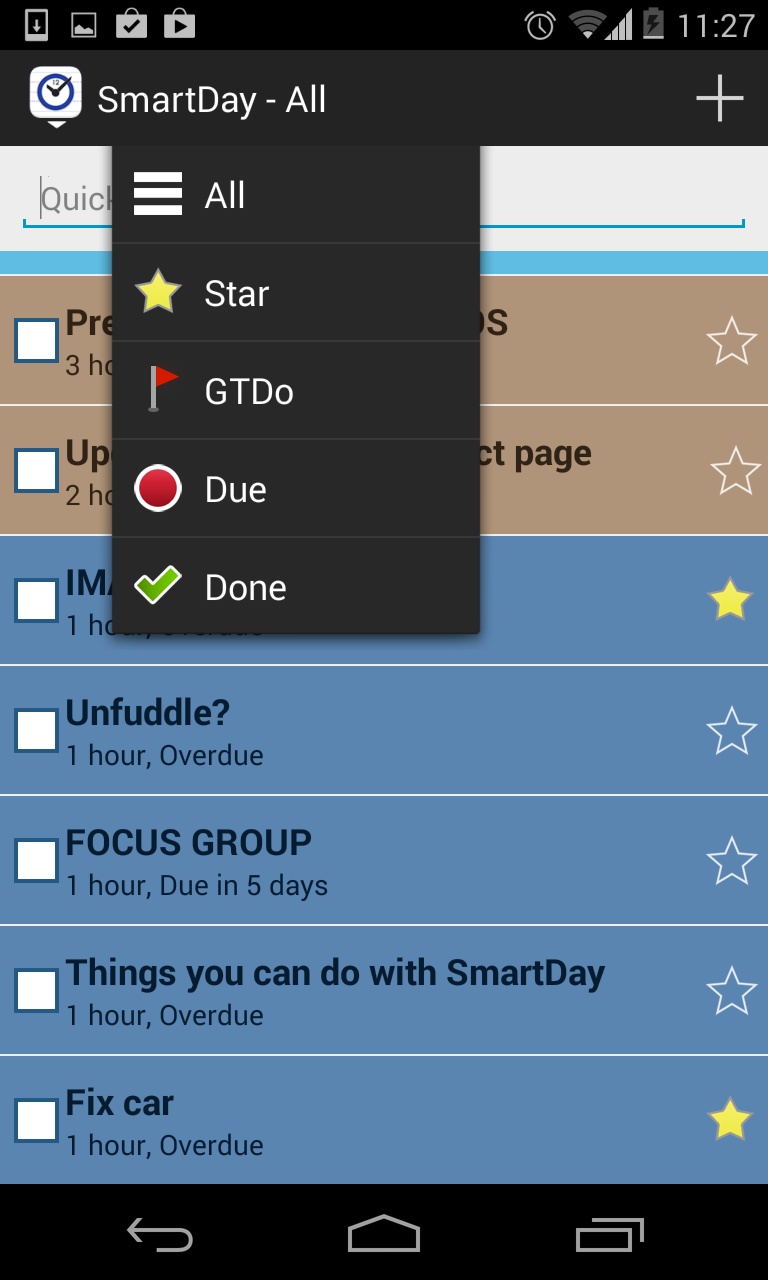
Drop-down menu for filtering and prioritizing tasks.
Here are some of the Filters you can use:
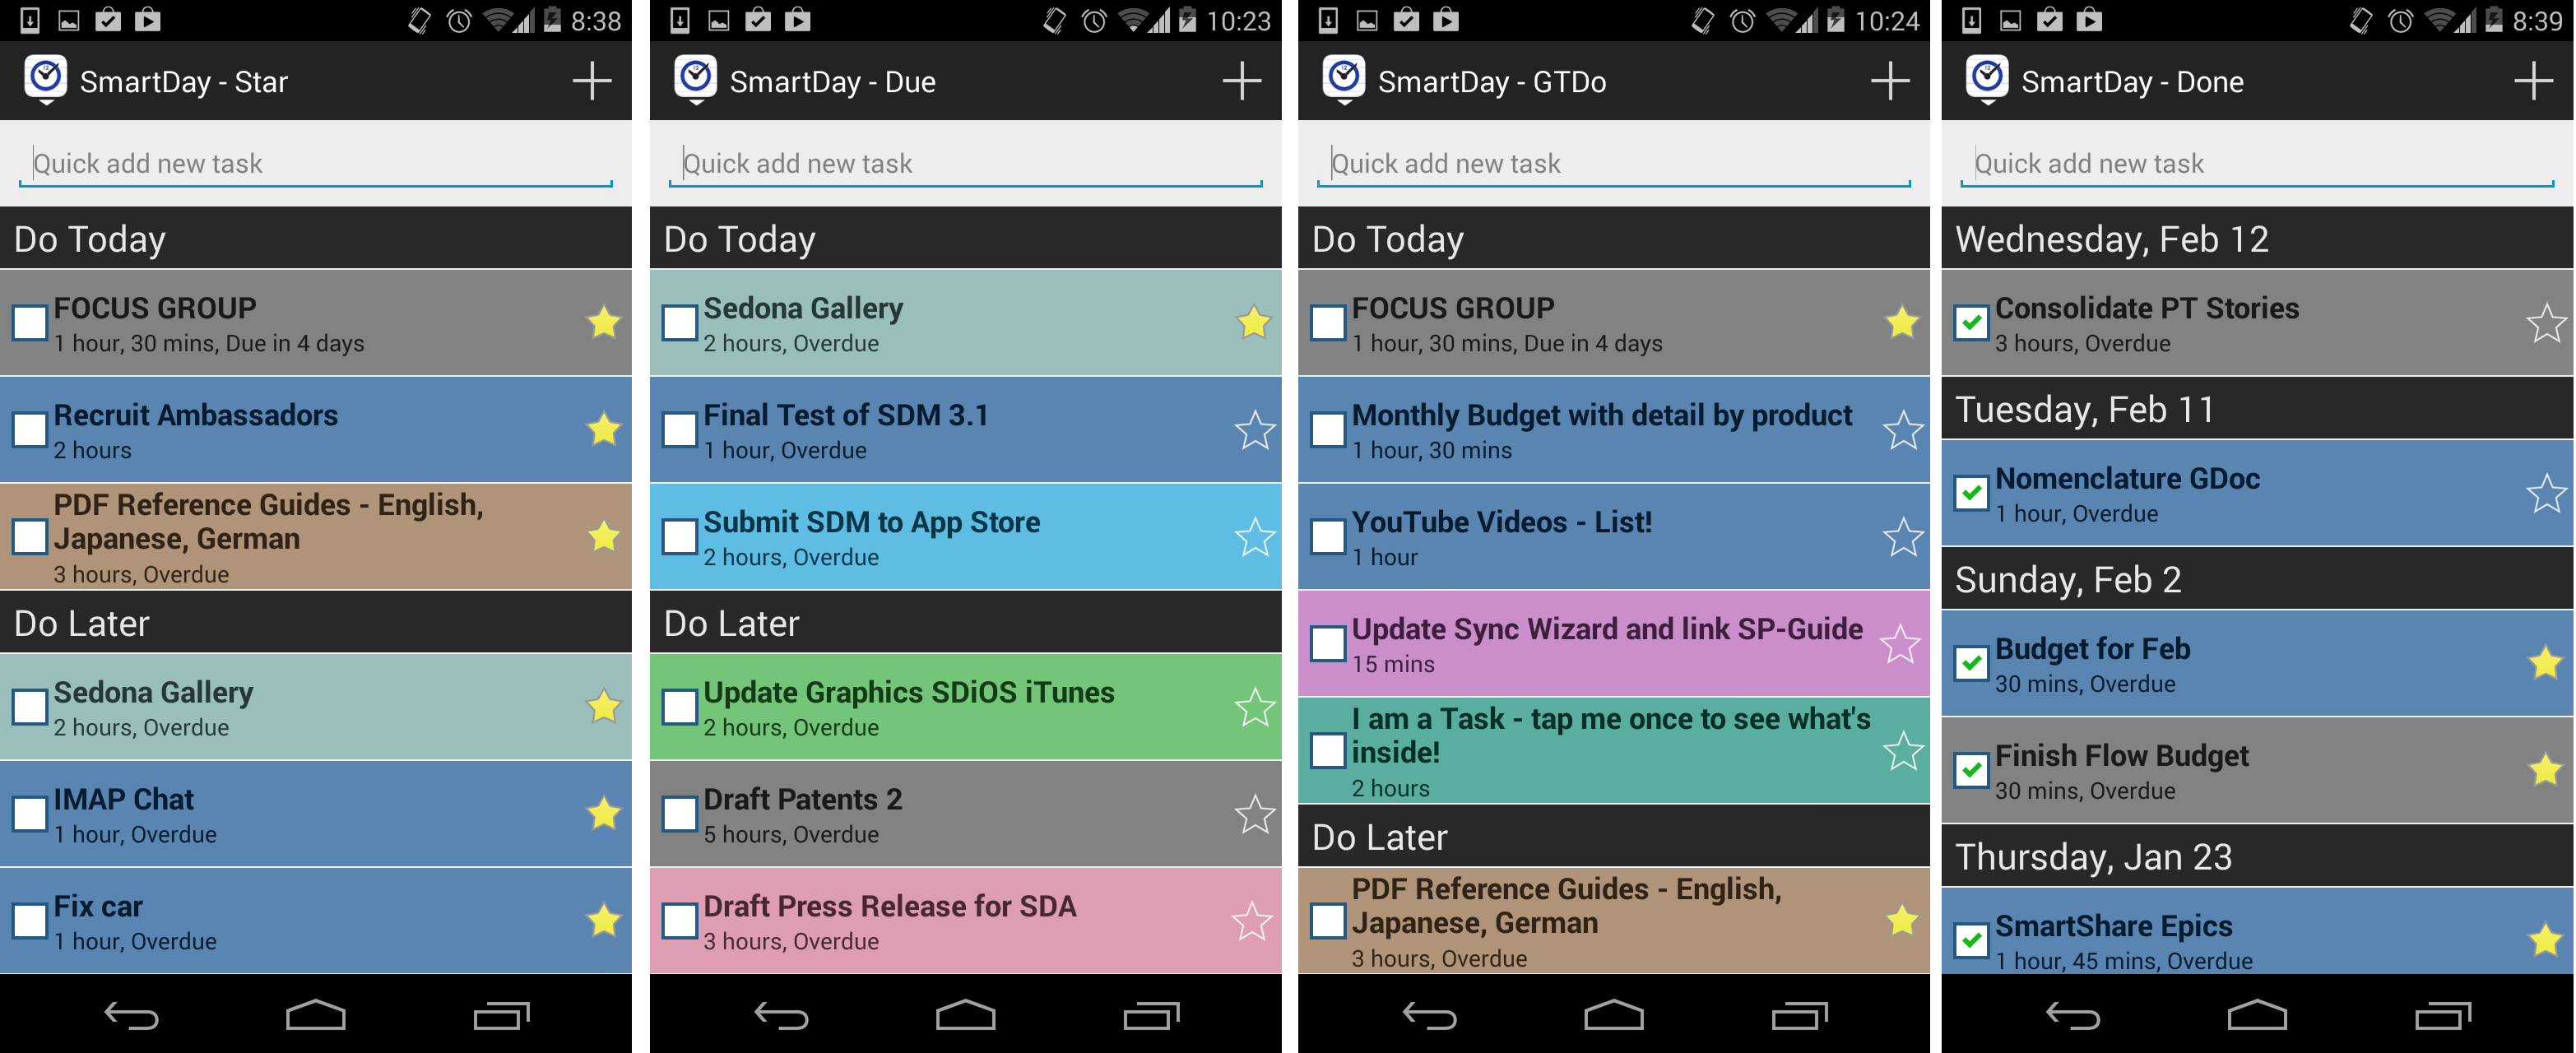
Star, Due, GTDo, and Done Filters
- Star Filter is a handy way to pick the tasks you want to work on today. Just tap on the Star on the right side, then select the Star filter!
- Due is both a Filter and a Sort; it only shows Tasks that have a Due date, and it sorts them by when they are due. This is a handy way to get what needs to be done, on top.Tip: Use a combination of the ‘Due’ and ‘Star’ filters. First, sort by due. Then, from that prioritized list, ‘Star’ the ones that you want to work on today. Then, apply the Star filter. From there, you can change the sort order manually by dragging them up or down in the list with your fingertip.
- GTDo is our homage to the “Getting Things Done” philosophy of productivity. When the GTDo filter is applied, it shows only the “top” task from each of your Projects. That way, you can Focus on the most important items from each of your Projects.Tip: Mark any GTDo task as done, and the next one from that Project automatically ‘flows’ in. Sweet!
- Done is a handy way to audit just what you have accomplished, when. Never lose your way.
Synchronizing with SmartDay
You can synchronize with your free SmartDay Online account by selecting the “Sync” button from the top of your Calendar View, or by “pulling down” on your Focus or Task views, to refresh. We suggest you do this each time you have made any changes to SmartDay Android.
Connecting with CalDAV calendars (* requires SmartDay for Mac OS X)
If you have SmartDay for Mac OS X, you can connect directly to the Apple Calendar. The Apple Calendar also supports subscribing other external CalDAV calendars such as Google and Outlook. Please see instructions for Apple Calendar. Once you have external calendars visible in your Apple Calendar, those will also appear in SmartDay for Mac. After you sync SmartDay for Mac with SmartDay Online, you can then view those on SmartDay for Android.
Note: SmartDay for Android does not connect directly with Google calendar on your Android device.